Keysearch - Keyword Research Tools For Startups & Entrepreneurs to Find High-Powered Keywords
में 2 वर्षों पूर्व पोस्ट किया गया।The Best Keyword Research Tool: A Comprehensive Guide. Take Your SEO to Another Level & Overtake Your Competition

Keysearch - Keyword Research Tools For Startups & Entrepreneurs to Find High-Powered Keywords
Product name: Keysearch
Vendor: Ben Hawkshaw-Burn ( Co-Founder @ IT Marketing Agency Geekytech )
Front-end price: $17
Homepage Review: Click Here
Release Date: 12/17/2015
Release Time: 11:00 EDT
Niche: General
Recommended: Very High
Skill levels needed: No need any skills
Support: Effective Response
Refund: 30 Day Money Back Guarantee
The Best Keyword Research Tool: A Comprehensive Guide. Take Your SEO to Another Level & Overtake Your Competition

Our keyword tool gives you multiple ways to find related, niche relevant keywords in any niche. Just put in a seed keyword and Keysearch will return hundreds of related keywords with search volume, CPC & PPC data. Refine your search with our Related Keywords, Google Suggest, Amazon Suggest, YouTube Suggest finders and our own database of over 1 billion keywords. Now if that's still not enough, you can even enter your competitors URL and have Keysearch grab keywords that your competitors are ranking for, giving you endless ways to search for hidden gem long tail keywords. Did I mention our YouTube research section & advanced filtering options? SEO just became much easier. Add Search Engine Optimization (SEO) into your next strategy so it fits more seamlessly as an extension on the existing business structure or product setup/process, keeping customers happy but also optimizing profits quickly.

The Best And Most Affordable Ahrefs Alternative
When we set out to create Keysearch our initial vision was to give everyday bloggers and small businesses a cheaper more affordable alternative to ahrefs.
As many of you know ahrefs is considered the gold standard of SEO tools. Their backlink database is second to none and it has driven their entire toolset to become the SEO software industry leader.
Here at Keysearch our goal wasn’t to compete with ahrefs but to offer an ahrefs alternative. Giving users a great set of SEO tools that meet the needs of 99% of customers looking to improve their search engine optimization at a fraction of the cost. Let’s take a look at how we stack up:
Keyword Research Tool
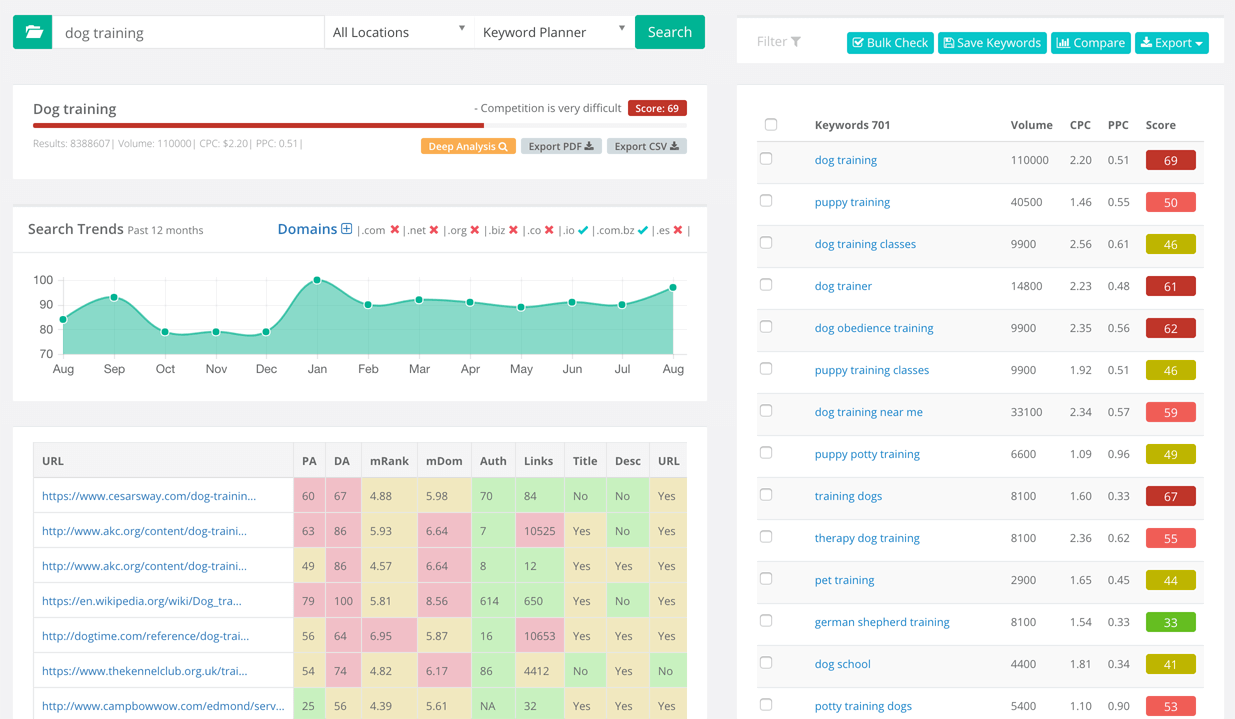
The heart and soul of Keysearch is our keyword research tool. To be honest this is an area where we feel we beat ahrefs hands down. Unlike ahrefs we pull our keyword data from various sources and are not confined by a single database. This gives you more keywords and very little chance of your keyword not returning keyword ideas or data (which can happen often with ahrefs).
Our keyword difficulty algorithm and analysis tool is also much more precise than ahrefs which only factors in 1 metric when it comes to keyword difficulty (linking domains). We have over a dozen different data points we factor into our difficulty algorithm. This includes backlinks, on-page factors, google results count, and much more. We also keep our algorithm up to date with Google’s latest changes.
You can choose to get search suggestions from Google Keyword Planner, our own database of over 1 billion keywords or other suggestion options such as Google Suggest, Amazon Suggest, YouTube Suggest, etc.. This gives you much more suggestion options than ahrefs, allowing you to find even more keywords with included search volume and CPC data.
Our bulk keyword difficulty checker is also something that no other tool can match. Real-time keyword difficulty checks in bulk rather than relying on cached data for bulk difficulty metrics.
Keysearch Explorer
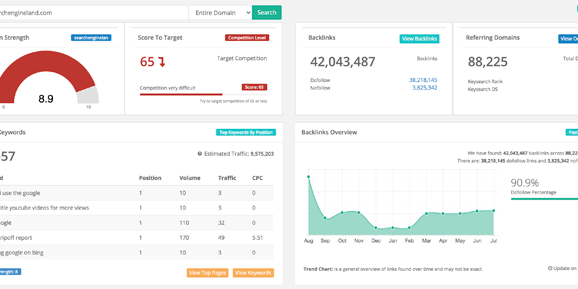
Our Explorer tool allows you to dive into backlink data, organic search, and traffic data for any website or webpage. We also incorporate this data into our keyword research section. So, similar to ahrefs, you can see traffic estimates and ranking keyword counts right from our keyword research and keyword difficulty tools.
Backlink Checker
Now we don’t boast to have a backlink database nearly as big or as fresh as ahrefs (who does?). But our database does contain over 100 billion backlinks and crawls the web non-stop, 24/7. This gives you the ability to view your backlinks and also find great link building opportunities by researching competitor’s websites.
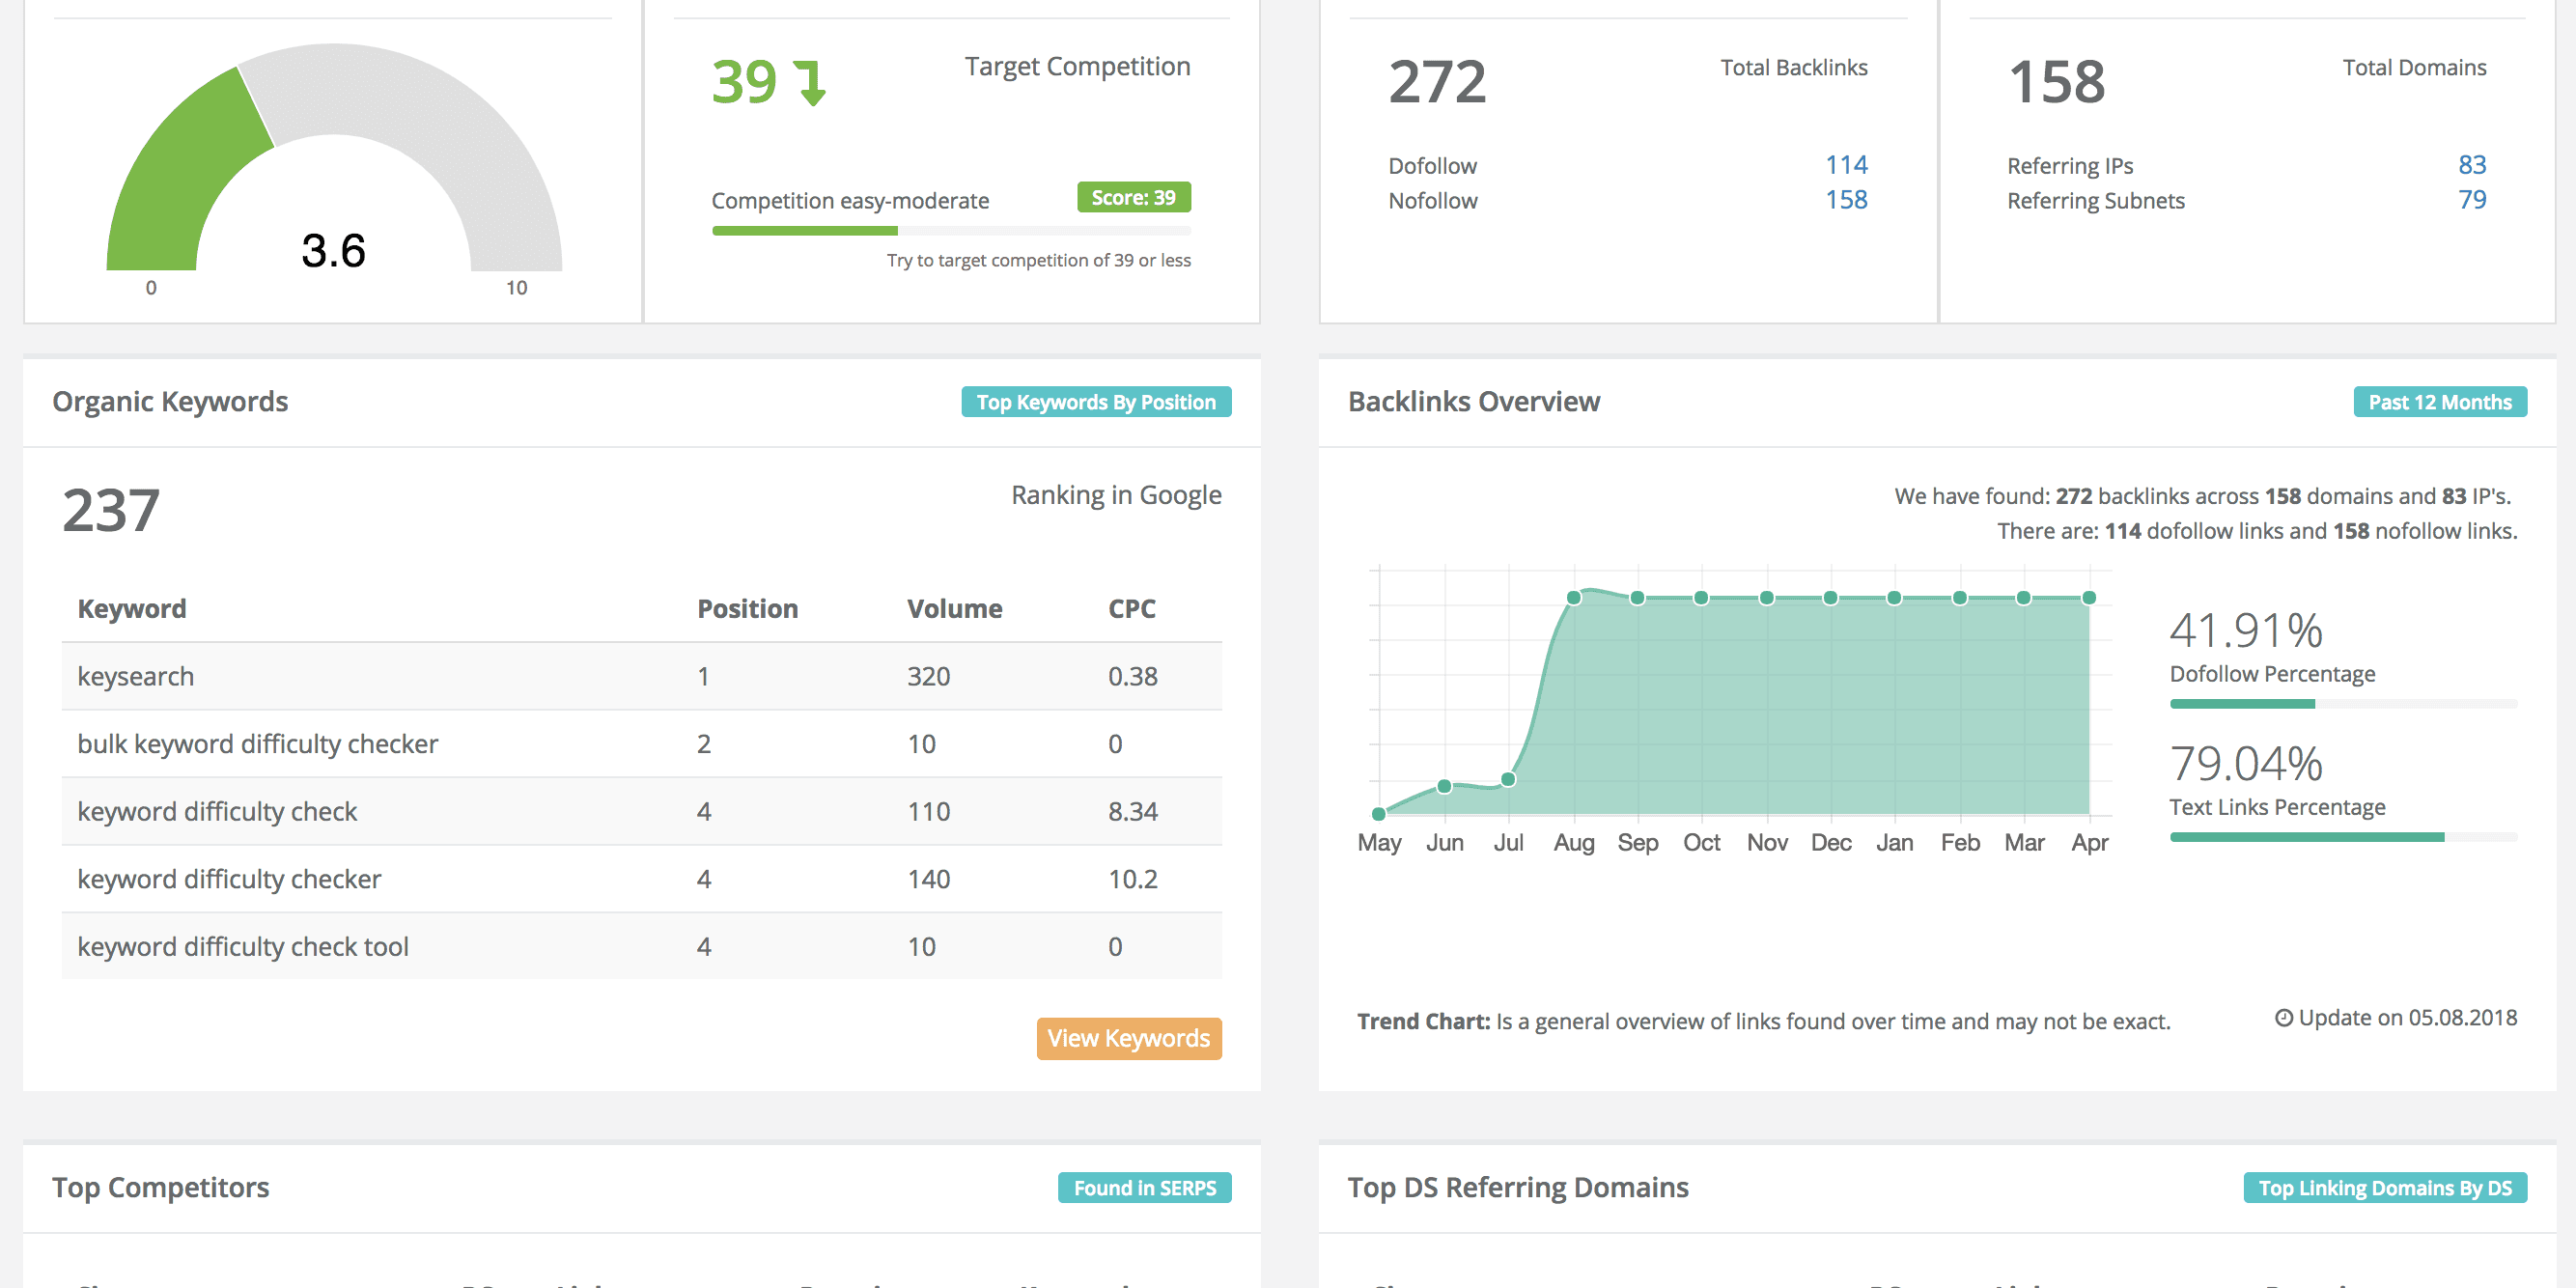
Organic Keywords
Our Google organic search database currently has google search data on over 80 million keywords and growing, with stats updated every 30 days for most keywords.
We show you things like your top ranking keywords, competitors, top referring domains, anchor text, and ranking distribution. In addition, we let you know what difficulty score we feel your site should be targeting when looking for keywords.
Our organic search features allow you to see which keywords you are ranking for as well as what keywords your competitors are ranking for. This way you can easily steal their keywords right from under them!
Competitor Gap Tool

You can also use our Competitor Gap feature which is similar to ahrefs Content Gap tool. This is where you can type in one, or multiple competitor’s websites and see which keywords they are ranking for and you are not. Allowing you to find great keyword ideas you wouldn’t have thought of otherwise.
Rank Tracking
Our rank tracker is not nearly as complicated or as sophisticated as ahrefs. Once again we set out to create a toolset that caters to what most everyday bloggers and small businesses need. A simple tool that tracks your rankings and does it well.
We update your keywords rankings daily (ahrefs top-tier plan is only every 3 days) and track your progress in a simple-to-use interface that doesn’t take weeks to learn. After adding a domain to track we also show you keywords we’ve found that you are already ranking for, letting you decide whether you’d like to add those to the daily rank tracker as well.
Keysearch The Affordable Ahrefs Alternative
We won’t claim to be better than ahrefs. Personally, we are big fans of their tools. Their big data capabilities are unmatched. For large SEO agencies, there really is nothing that compares to the data they can provide and SEO audit functions.
With that said though, that is not our goal. We want to provide useful tools for everyone. This is why unlike ahrefs we also have an entire section dedicated to Youtube Research and Youtube SEO. Helping you get your videos ranked on Youtube by offering the same type of keyword difficulty scores we offer in our regular keyword research but for Youtube! How cools is that.
Also, our Content Assistant tool (click the link to read more about it) will be an incredible addition to your SEO toolbox. Here we analyze the first page Google results and show you exactly what you need to compete with the top 10 pages (topic ideas, keywords to include, word count, etc..). This tool can help bring rankings back to life for new or old pieces of content on your site.
Try Us
If you’d like to see if Keysearch is for you, then take us for a spin. Just signup for our an account here. You can also use our 20% off discount code KSDISC which makes our Starter plan only $13.60 per month compared to ahrefs $99 per month. You can’t really beat that!
Keyword Research
- When it comes to finding relevant keywords for your business, you're always looking for multiple "best" way, but no one knows all the best keywords in your niche and are limited in their search. You need a tool like Keysearch to help you find high quality keywords.
- Keysearch is the all-in-one search engine that gives you hundreds of keyword suggestions, keyword rankings data, CPC & PPC data, related keywords (over 100), and much more.
- Keysearch can do it all! With a few simple clicks of your mouse button, Keysearch will tell you the best keyword matches in any niche along with providing daily updates
Use Keysearch to find keywords related to your content and find better traffic & rankings.
Keyword flowcharts & trend data can help you improve your marketing strategy and generate more quality organic traffic. Plus, you don't have to spend hours writing content for new sites or spend money on other tools like DMOZ, Moz Analytics and AdWords. Keysearch will help you quickly find hot, relevant keywords for your content.
Keyword flowcharts can help you improve SEO performance and boost conversions. Plus, with Keysearch, you only pay for the keywords that you use and not for all the irrelevant keywords!
Keysearch is free to use, but please aim higher than the competition! Make sure your website is a place where your visitors will want to stay!
Competition Analysis
- If you are having trouble climbing the ranks on Google, Adwords, Bing, or any other similar search engine, you may be a victim of competitive analysis paralysis.
- Keysearch is dead simple to use, and with just a few clicks you'll get a concise concise analysis of your competitors' websites and online presence. With Keysearch there's no need to scour all over the Internet for competitive data — Keysearch will save you all the time & effort!
- With Keysearch's algorithm built-in features and easy-to-use interface, Keysearch is a user-friendly tool that you can use to analyze every aspect of your website's performance.
Whether you want to increase search rankings of your blog, website, or Twitter account to advertise your products or services, we can help
Keysearch is an alternative approach to competitive analysis. Our algorithms are on the cutting edge of competitive analysis research, not only being able to analyze millions of keywords, but being able to understand them in ways that other competitors cannot. We then use our insights and expertise in search engine optimization and rank prediction technologies to bring the best possible SEO results for your campaign. Keysearch will give you a score for each keyword, along with a guide for ranking and developing in Google, helping you improve your search position faster.
Dozens of Fortune 500 companies are already using Keysearch as an invaluable tool in their day-to-day business management. Our powerful software makes it easy for
Rank Tracking & Intelligence
- If you want to rank in the top 10% of Google search results, Keysearch will help you do it. It's a powerful, easy-to-use product that helps you automatically track rankings for your keywords (and your competitors too!), incorporating all your keyword data into one dashboard. Keysearch will make it easy to manage rankings and compete effectively. Don't stop there! With our Competitive Analysis tool and our SEO Explorer feature (that lets you control who is actually ranking), we have created the ultimate SEO tool. Keysearch is a powerful tool for competitive analysis, ranking analysis and competitive intelligence.
Keysearch helps you monitor both organic and paid search results. You can track how many people are using your
Allowing you to spy on your competitors, check backlinks, rank your own pages in the search engines and much more. You can put in a list of URLs and bulk check metrics like PA, DA and Alexa.
Spy on competitors or check backlinks for your own sites. You can put in a list of URLs or bulk check generic keywords and metrics like PA, DA, Alexa, Google Top Rank for Traffic etc.
Using Rytr it's very easy to create backlinks for all your websites with just 2 clicks. Search from many sources and target keywords as you wish. Add any domains or link in just a few clicks! Calculate who is referring traffic to which
SERP Analysis Table
- We have updated the SERP analysis table to give you more relevant data. We’ve added a few columns and removed other columns that are no longer relevant to determining the keyword difficulty. In this tutorial, we will go over a description of what each column is telling you and why it may be important to determining the difficulty of a keyword.
SERP Analysis Table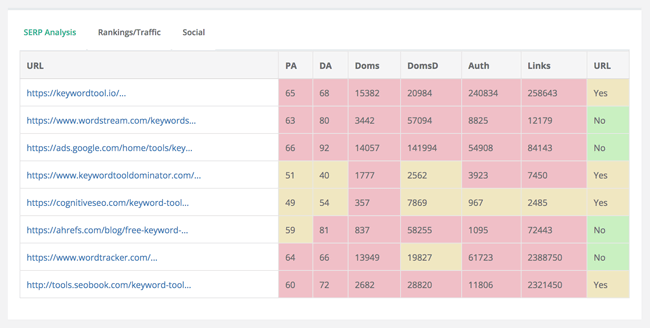
PA – Moz Page Authority
This column shows you the Page Authority for the given URL. Page Authority is a metric from MOZ which is a representation of the overall ranking strength potential of that individual page.
DA – Moz Domain Authority
This is similar to Page Authority except for the overall domain. Domain Authority shows you how strong the domain’s ranking potential is. A strong domain can lift the individual pages to rank better for keywords even when the individual pages themselves might not be quite as strong. An example of this is how Amazon and Wikipedia rank many pages on the first page of Google that have few if any incoming backlinks. This is due to the strength of those domains lifting those pages up to rank well.
Doms – Domains
This column shows the number of unique linking domains to the given URL. The more unique linking domains usually indicate a stronger backlink profile and hence a stronger page.
DomsD – Domains to Domain
This gives you the number of unique linking domains to the entire domain the URL sits on. So if the URL is an Amazon URL, the DomsD is showing you the number of linking domains to the entire amazon.com domain.
Auth – Dofollow Links
Auth stands for authority passing links. To simplify, this means the amount of external dofollow backlinks pointing to the given URL.
Links – Backlinks
This is the total number of incoming external backlinks both dofollow and nofollow.
URL
This column shows you whether the exact keyword match was found in the actual URL seen in Google.
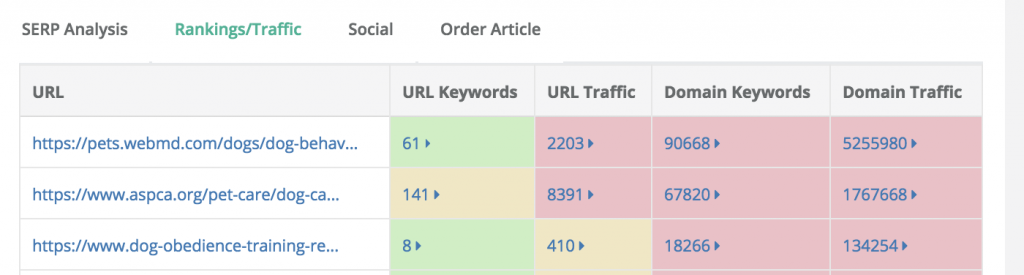
Rankings/Traffic Table
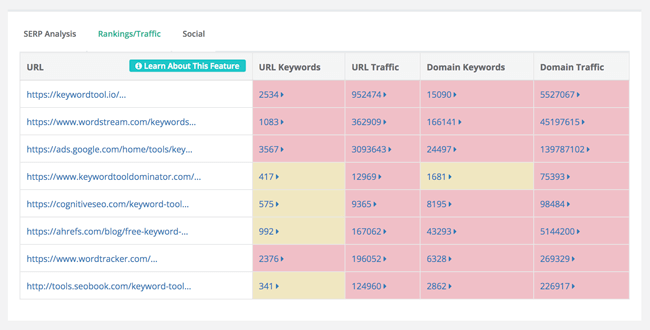
URL Keywords
The number of keywords we’ve found ranking for the particular URL.
URL Traffic
The estimated traffic coming from Google for that particular URL.
Domain Keywords
The amount of keywords we’ve found ranking for the entire domain the URL sits on.
Domain Traffic
The estimated traffic coming from Google for the entire domain the URL sits on.
Social
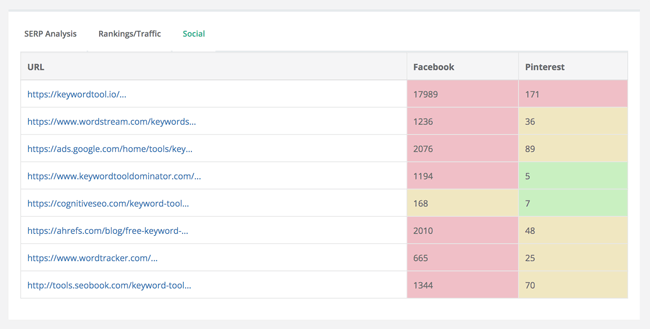
The total amount of Facebook shares for the particular URL.
The total amount of Pinterest Pins for the particular URL.
We’ve removed the mRank and mDom columns as these metrics are no longer supported by MOZ and were basically just duplicates of PA and DA. We’ve also removed the Title and Desc columns now that Google is dynamically changing the Titles and Descriptions shown in the search results. These no longer give any indication as to the keyword difficulty. Currently, for the time being, we still show these columns in the Deep Analysis section if you still would like to see them.
Cached Keyword Difficulty Scores
One of the most requested features of Keysearch was the ability to see more keyword scores without needing to check them manually. Today we’re happy to announce a new feature that does just that called “Cached Keyword Scores”.
Normally we had what we called a “real-time cache” of keyword scores (7-30 days depending). When doing a search we would only show these recently cached scores. The reasoning here, and something we prided ourselves on compared to other tools was that you always got real-time, up-to-date keyword scores. Most other keyword tools show keyword scores that have been cached for very long periods of time.
With this new feature update, you now have the best of both worlds! You see the real-time keyword scores as usual, and in addition, you also see more keyword scores immediately with our cached keyword scores database. Currently the feature is only available for Global (All Locations) and United States searches but we hope to bring it to every location option within the next few weeks/months.
Using Cached Scores
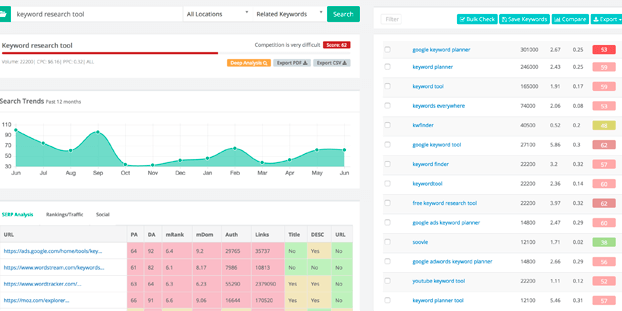
Freshly cached scores from our normal “real-time cache” will show with full color as usual. Cached scores not in the real-time cache due to age, will have a slightly dulled color. You can see an example of this below.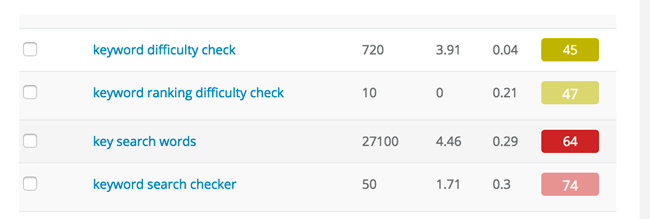
If you decide you want to update the data on a cached keyword score you can just click on it and it will update as usual. Giving you the same ability to update scores as before with the additional ease of showing more scores right from the get-go.
Benefits of Cached Scores
Since cached scores allow you to see more keyword scores during your searches you will be able to work faster and narrow down your keyword choices quicker.
Although keyword difficulty scores change over time, they usually don’t change that drastically. Cached scores will allow you to get a better idea of which keywords are already too hard to target, or on the other hand, show you keywords that might be easy and ripe for the picking. This allows you to not waste time and credits checking keywords that you wouldn’t bother with anyway.
Seeing more scores will also give you a better idea of the overall topic. If you load a keyword search and see a lot of red, you probably know the topic, in general, is fairly hard, and finding low competition keywords in that topic might be more difficult. The same works in reverse. Doing a keyword search and seeing very few red keywords will be a good indicator that this topic might have some keywords that will be easy to go after and rank for.
Bulk Check Credit Saver
In the preferences menu on the Settings/Upgrade page, you’ll see an option titled “Bulk Check Credit Saver”. This is enabled by default on all accounts.
What this does is skip over all cached scores when doing bulk keyword difficulty checks. This saves credits and makes it so you can check more keywords for difficulty or do more searches. If you don’t want this feature enabled and want to have all keywords including the cached scores updated, you can just uncheck this box.
Even with this unchecked it will still skip recently checked keyword scores in our real-time cache as it normally did before.
Cached Scores: Future Features
With the addition of the cached scores database, we now have access to more keyword scores to potentially incorporate into future features. For example, we have plans to use the cached score database within our Explorer and Organic Keywords section to show keyword difficulty scores there too. This is something we’ve begun working on and hope to have released in the next few months. The future is bright!
Explorer Now Uses Global Search Volumes
Traffic Estimates
Although traffic estimates should now be more accurate we want to re-iterate, these are just estimates. You may find your site or other sites are higher or lower than the actual Google traffic coming in. Our estimates are based on ranking position using the search volumes we have available (mostly from Google) and the keywords in our database. These traffic estimates should be used more as a comparison from site to site and not as any definite idea of what the traffic might be.
Since Google doesn’t publicly release click-through rates for their search results, and their search volumes are not 100% accurate (although we try our best to make them more accurate as you can read about here: https://www.keysearch.co/blog/ungrouping-close-variants/), it makes traffic estimates very difficult. Not to mention that our database does not contain every single keyword imaginable.
A Better Future
Due to this change, we will be able to expand the size of our database more easily, and incorporate more keywords from non-English speaking languages as time goes on. This should only make things bigger and better when it comes to your keyword research and site analysis!
Working With Lists

Staying organized can be daunting as the keyword research process moves along. You can easily start sifting through thousands of keywords, some winners, some losers, and forget what’s what. Although we do offer many export options that can help with this, one of the best ways to avoid your research becoming a complete disorganized mess is by taking advantage of the Lists features within Keysearch.
Getting Started With Lists
When you are on the Research page you’ll see a button above the keyword table titled “Save Keywords”. This is where you can create new lists or save to already created lists on the fly while in the midst of doing your keyword research. In order to save keywords to a list you just need to select which keywords you’d like to save by clicking the checkboxes next to the keyword. If you’d like to save all of the keywords in the table you can use the select all box at the top of the keyword table.
Once you’ve selected the keywords you’d like to save, click the “Save Keywords” button which will bring up a popup window. In this window, you can either “Add to a new list” which will save the selected keywords to a brand new list, or select one of the previously created lists to save the selected keywords. If you choose “Add to a new list” you will be prompted to name the list. Once named, hit the “Add to list” button, and voila! Your keywords are now saved to a list.
Navigating the My Lists Page
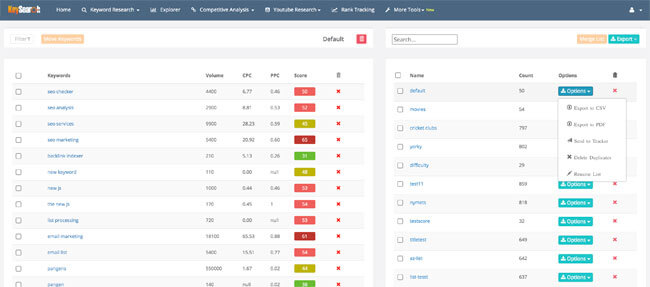
The “My Lists” page is where you can access your already created lists and do some further organizing if you’d like. You have the option to view all of the lists, see the keyword scores/keyword data, delete keywords from the lists, and move the keywords around to different lists.
The left-hand table shows you the list of keywords in the currently selected list. You can flip through your lists by clicking on the lists in the right-hand table. This will then show the corresponding keywords for that list in the left-hand table. The right-hand table also allows you to see how many keywords are in each list along with export options, the ability to rename the list, send the keywords to the rank tracker, delete potential duplicate keywords within the list or delete the list entirely. Above the right-hand table is also the ability to search your lists, more export options, and the option to merge your lists together.
Moving Keywords
If you’d like to Move Keywords to a different list, just select the checkbox next to the keywords you want to move, click the “Move Keywords” button and a popup will appear. Then select the list you’d like to move the keywords to. You will then be asked whether you want to move the keywords and delete them from the current list, or move and keep them in both lists. Once you choose which option you’d like, the keywords will be moved.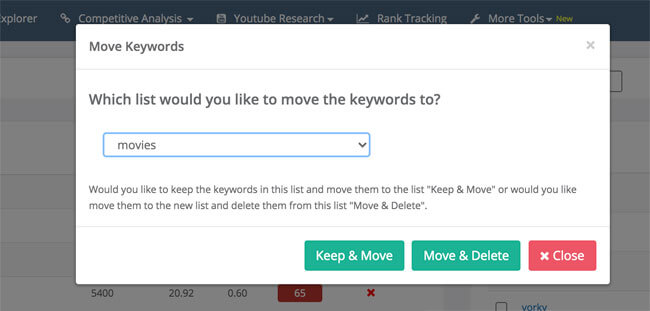
This allows you to organize your lists in whatever way you’d like. Since you can always move keywords around different lists you don’t need to worry about organizing them while you are deep in the keyword research process. You can organize later so you don’t break your flow.
Merging Lists
Merging lists allow you to combine entire lists together. Just select the checkboxes next to the lists you’d like to merge and you will be prompted to name the new merged list. Keep in mind when merging lists, the old lists will be deleted leaving just the new merged list.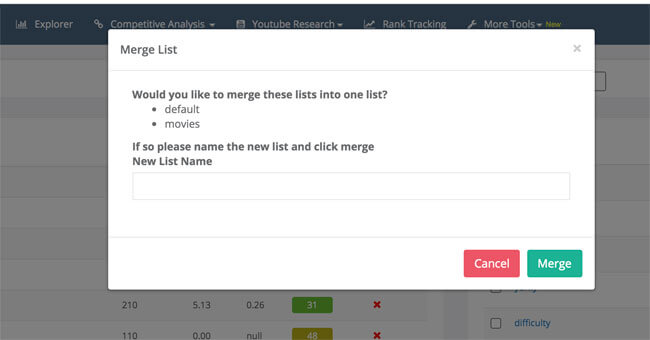
Delete Duplicates
The “Delete Duplicates” option checks your lists for any duplicate keywords. It will then clean the duplicates leaving just one copy of the keyword. This comes in handy since many times users create lists around a certain topic. During the keyword research process, you may search similar phrases, saving big lists of keywords to one main list, not realizing that the same keyword has been put in the list multiple times.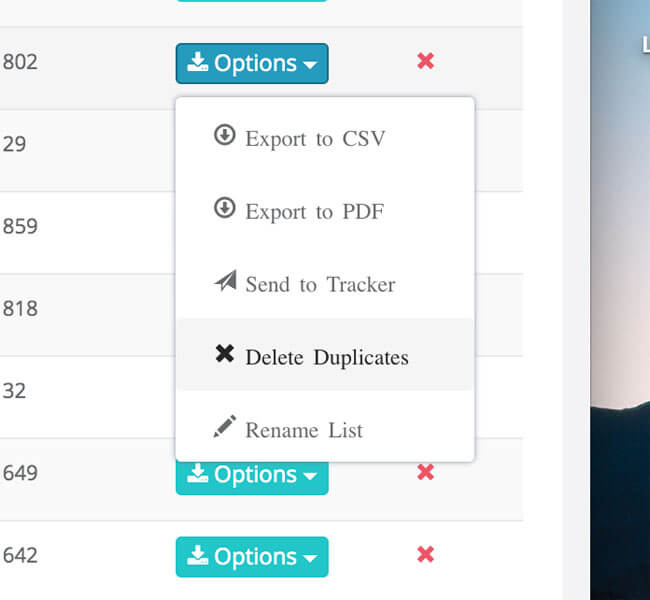
Send To Tracker
This option can be very handy. Let’s say you’ve found a few hidden gem keywords and want to start tracking your rankings for these keywords. The “Send To Tracker” feature allows you to automatically add these keywords to the Rank Tracker right from the My Lists page. Just select which keywords you want to start tracking, which location you’d like them to be tracked in and the URL you want to be tracked. The keywords selected will then automatically be added to your Rank Tracker.![]()
Keeping Organized With Lists
When first starting out with Keysearch it may not seem that you’ll need to utilize the lists feature but you may quickly realize that exporting many different files, remembering which keywords you liked and didn’t like, etc… can become a big hassle. The lists feature makes this all super easy and puts all the tools needed in one centralized place. The export options available through creating lists also allow you to export the data in a more organized fashion than you might get by exporting directly from the Research page.
Make sure to check out other Keysearch tutorials on the Keysearch Tutorial page!
Update Search Suggestion Names and Simplified Credits
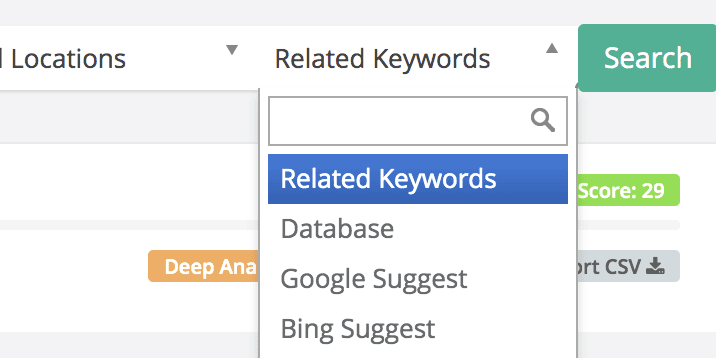
Today at Keysearch we made a subtle change that should simplify things moving forward. We changed the name of the keyword suggestion type from “Keyword Planner” to “Related Keywords”. We also changed the “Keysearch Database” option to just “Database”. Normally a change like this would go unannounced but since it involves a slight change and simplification of our credit system we wanted to write up a quick post about it to clarify.
Why the Change?
The Keyword Planner option in Keysearch has slowly been expanding on Keyword Planner suggestions for years and has really morphed into more of a “Related Keywords” search option. We haven’t relied solely on Keyword Planner when using this setting in a long time. To continue calling it “Keyword Planner” is just no longer accurate. Here are few more specific reasons why.
Not Returning Exact Keyword Data
As discussed in the article Ungrouping Close Variants Keyword Planner and Google, in general, are no longer showing accurate search volumes for the majority of keywords, nor are they returning data for many keywords. We here at Keysearch have been correcting this for some time now and ungrouping these close variants.
Not Showing Results
Keyword Planner has stopped showing suggestion results for many different queries they determine sensitive. We here at Keysearch have already been compensating for the lack of Keyword Planner results for years by supplementing these searches with our own database suggestions.
Showing Limited Results
Sometimes Keyword Planner was showing very limited results and we were able to deliver many more results by combining suggestions from our database.
Better Suggestions
By incorporating a hybrid approach of Keyword Planner suggestions and our own database, we are able to deliver better keyword suggestions for many searches.
Time to Update The Name
All in all the “Keyword Planner” option was already a hybrid for a long time now and the name just doesn’t reflect what is actually going on behind the scenes anymore.
Credit Changes
Basically what this means for credits is that we no longer will have 2 different credit systems “Super Searches” and “Regular Searches”. All credits will be the same and you won’t need to worry about running out of Super Searches. For current users, absolutely nothing is changing. You don’t lose any credits. Your Super Search credits will just be added to your regular credit count. Nothing will be different on your end. The only thing that will be different is you no longer need to care about 2 different credit systems :).
So Do We Still Get Keyword Planner Suggestions?
Yes, you do. Like I said nothing is really changing except we are now calling the suggestion option “Related Keywords”. We will be using Keyword Planner suggestions in the “Related Keywords” searches just like we have been.
Keysearch Database vs. Database
Before this change, the “Keyword Planner” option had smaller credit allotments (Super Searches). To compensate for this we were using keyword planner suggestions in addition to our Keysearch Database suggestions when the “Keysearch Database” option was selected. This way, users wouldn’t lose the benefits of Keyword Planner suggestions when their Super Searches were exhausted.
This lead to the old “Keyword Planner” option and “Keysearch Database” option having very similar outputs. This was advantageous when credit limits were smaller for the “Keyword Planner” option but now is no longer needed since you are no longer restrained to smaller credit limits with the new “Related Keywords” option.
Due to this, we changed the name of the “Keysearch Database” option to just “Database”. It now acts more similarly to a Phrase Match or Broad Match database search and will be more of a complement to the “Related Keywords” option. Giving results from our database that are more “match” keywords rather than related.
Keysearch Opportunity Finder
The launch of our Content Assistant tool a few months back was our first foray into creating different types of tools that you wouldn’t normally see in SEO software. We want to think outside the box and offer practical tools that make building traffic to our websites easier. The reason I mention all of this is that we feel similar about the newest addition to our feature set called Opportunity Finder!
What is Opportunity Finder
Opportunity Finder is a tool that helps you locate sites within your niche where you can further build your brand, traffic, and potentially backlinks as well. It allows you to quickly and easily find guest posting opportunities, forums, and blogs. All of this is laid out in a format where you can see the stats of the sites found, their link metrics, traffic, ranking keywords, brief description, etc.. (In the future we hope to add more “finder” options as well).
This is the type of tool when we were just starting out building our brand that we would have killed for! What sites can we potentially guest post on to build links and traffic? Where are our audience and other influencers in our niche so we can start engaging and get the word out? These are some of the problems we hope Opportunity Finder will help you solve.
When you load up Opportunity Finder you’ll see a search box with 3 options.
Guest Posts
Forums
Blogs
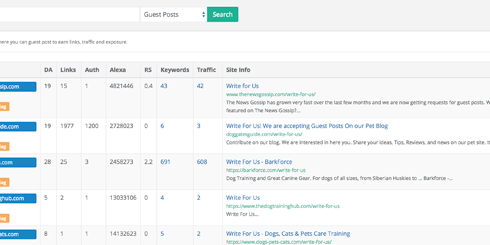
Guest Posts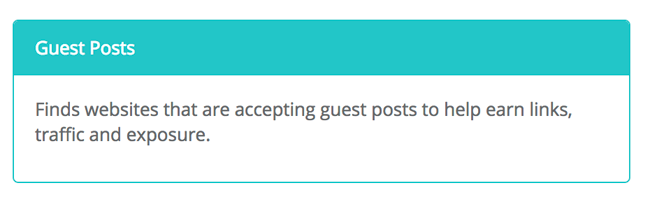 The Guest Posts option finds websites that are accepting guest posts to help you earn links, traffic, and exposure. What is a guest post you ask? That is where another website allows you to write an article for them (usually for free) but in return, you either get a backlink or get to feed off some of that site’s traffic. Ideally, in a perfect world, you get both!
Guest posts are extremely powerful and probably the best way to go about white-hat link building. As I mentioned above though, link building is just 1 benefit of guest posting. If you get a guest post on a highly trafficked site you will have a new traffic stream coming in as well. This can help you get your brand and name out there.
Forums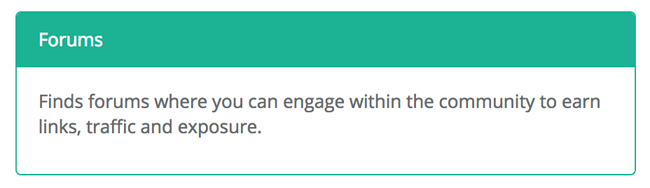
In certain niches, forums can be your best friend. They can be a place to find other people interested in your niche. Where you go from there is entirely up to you.
If you engage within these forums this can be brand building within itself. You can build your name as an expert by providing good quality topics, answers, and conversation. You can use your forum signature space, profile area, or posts to build backlinks and help draw traffic to your site. You can engage with other blog or website owners, forming relationships that can also help you build brand awareness and backlinks as well.
Some niches won’t have the same type of forum community as others, but for the ones that do this can be a huge untapped resource for taking your website to an entirely new level.
Blogs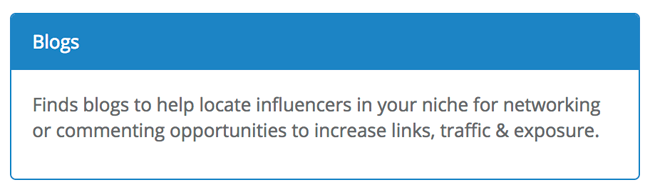
When describing the power of blogs it’s tough to not use the word “influencers”. That word has become so tainted over the last few years as it usually drums up thoughts of half-naked people on Instagram, using hashtags to promote products they were paid to promote.
This is not at all what I mean when I refer to influencers. When I mention “influencers” I am talking about powerful people or businesses within your niche where your target audience lives and breaths. By having the ability to quickly find blogs within our niche, see the ranking keywords, traffic, metrics, etc… We are able to identify what our audience is looking for and who are the big players we might be able to network with.
For you link builders and brand builders we’ve also set an option where you can just search blogs that have comments enabled. This way you can join the conversation, engage with “your audience” and niche influencers while also getting some icing on the cake with a link back to your site as well.
Opportunity Finder Overview
Using Opportunity Finder is extremely easy. Just choose your option from the drop-down menu (Guest Posts, Forums, Blogs) and type in a keyword phrase. You should then see the results load up and the number of sites we found for the query in the top right.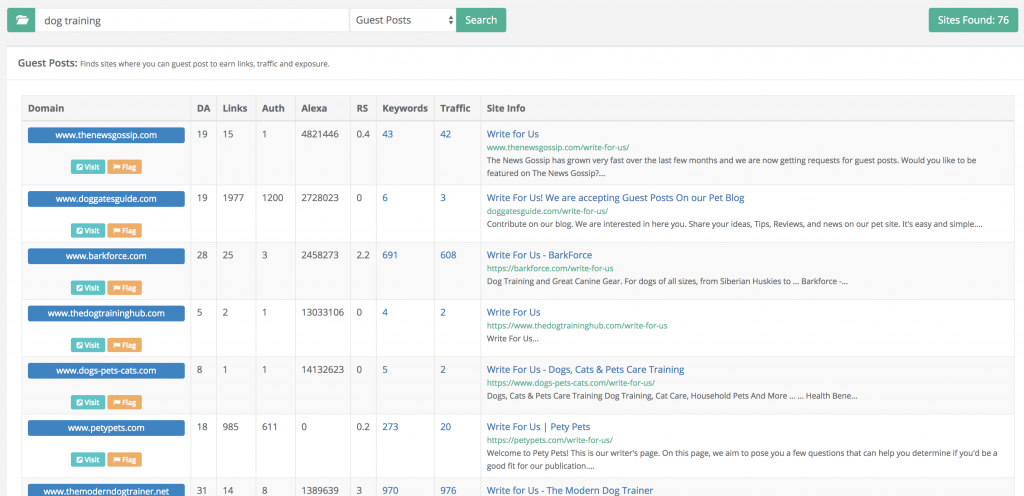
You’ll see the main domain of the sites found in the left column. You’ll also see 2 options “Visit” and “Flag”.
Visit this should show a popup that loads the webpage we found, You can also go to the webpage by clicking on the link in the “Site Info” column. That will take you directly to the webpage in a new tab rather than opening in a popup.
The Flag button is used to notify us when one of the results is no longer active, out of date, or just all around irrelevant to the results. Since our database contains hundreds of thousands of sites, sometimes results get past our filters that shouldn’t be there. This is when you can use the flag option to notify us of the URL so we can review it and remove it from our database if need be.
After that, you’ll see the metrics columns which are similar to the columns found elsewhere in Keysearch.
DA is the Domain Authority of the website
Links show the number of links to the website
Auth is the amount of juice passing external links to the website
Alexa is the Alexa rank of the website
RS is our Rank Strength metric (click the link to read about) which shows the true ranking strength of the website
Keywords show the amount of top 100 ranking keywords the website has
Traffic shows the estimated Google traffic of the website
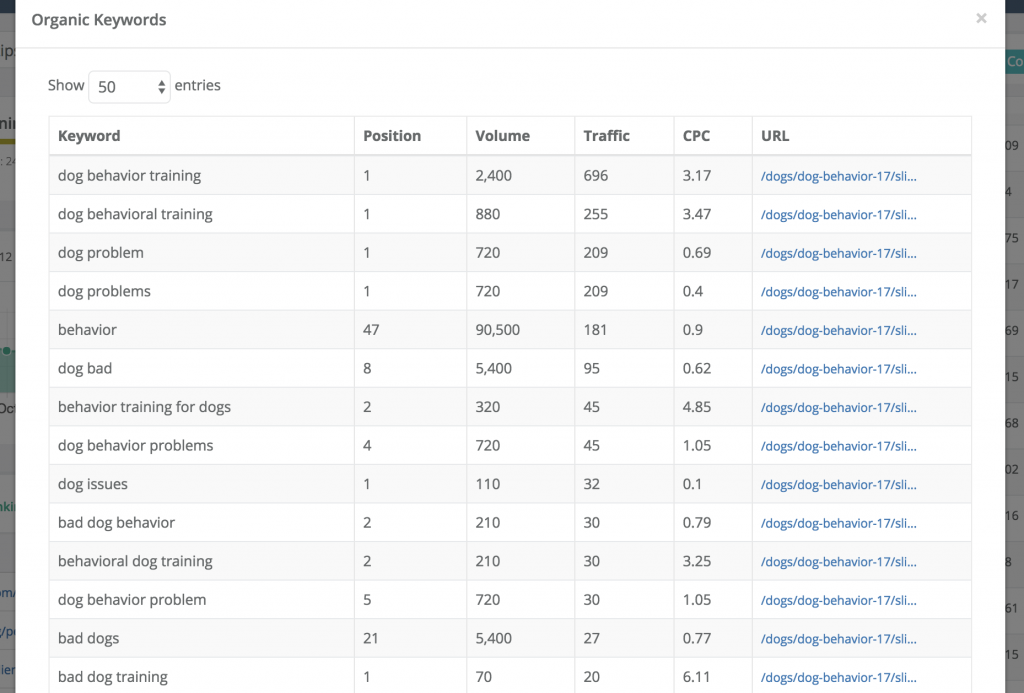
You can click on the Keywords or Traffic numbers to open a popup and show the actual ranking keywords, their positions, and search volumes. This is a great way to make sure the website is ranking for keywords in your niche and is a worthy opportunity.
In the last column you should see the “Site Info” we’ve gathered on the webpage and website found. Here you can get a quick idea of whether the site is a good match for you. You can also click the link to open the webpage or website in a new tab.
When searching with “Blogs” selected in the drop-down menu you’ll see one more option on the right-hand side “only Blogs With Comments”. When set to “Yes” this will filter out any blogs that don’t have comments enabled.
Conclusion
Opportunity Finder will continue to be a work in progress as we add more sites and options. Our crawlers are working 24/7 to find more opportunities so the database will only be getting bigger and encompass more and more niches.
As usual with any of our new releases, we consider this a beta release. It may not be conventional wisdom but we like to get the tools in your hands as quickly as possible and work out any last kinks along the way.
We hope Opportunity Finder will make your lives easier and help you build your brand like never before!
Content Assistant Tutorial
For all of you bloggers and article writers out there we are happy to introduce a new tool in our feature set called Content Assistant!
Content Assistant is not your typical on-page SEO optimization tool. Most of your usual tools (for example Yoast) are there to help you with things like optimizing meta descriptions, page titles, headings, etc… Content Assistant is different. The main goal of Content Assistant is to help you maximize the ranking and traffic potential of the target topic.
Rather than concentrating on the technical SEO aspects of our article, Content Assistant helps us break down what type of content Google is looking for within the top page results and allows us to get the most out of each article we create.
It is also not meant to replace the normal keyword research functions. Content Assistant should be loaded up after you’ve already figured out which keyword and topic you’ll be writing about.
Content Assistant In Action
Recently we decided to release our brainstorm function for free. We created a landing page for it targeting the overall topic “niche ideas.” We put together a landing page that we thought was competitive for a first-page result. Our page hovered around the 4th and 5th page of Google for weeks.
On Sept. 4th we decided to use the page as a case study for Content Assistant. We optimized our landing page content as per the “Must Words” and “Recommended Keywords” suggested by Content Assistant. We increased the word count to be more competitive with the top page results. We also used the “Content Snippets” and “Questions” for quick research. After Google re-crawled the page our rankings immediately went up to 27th and then as of today have gone up to #14!
We hadn’t created any other backlinks (the internal link seen above was created today after the rankings update to further try and help rankings).
Now we are not guaranteeing these sorts of results for everyone and there could be some other factors at play here as well. Without a doubt though Content Assistant helped. This is not the only page of ours where we’ve seen gains after using Content Assistant but for the sake of keeping things brief, we are only including this particular page as an example.
Getting Started With Content Assistant
If you’d prefer you can skip down to the bottom where we created a quick video overview that explains most of what is in this tutorial.
When you first open Content Assistant you will see the usual Keysearch search bar. Here is where you will type in your main keyword phrase or topic idea.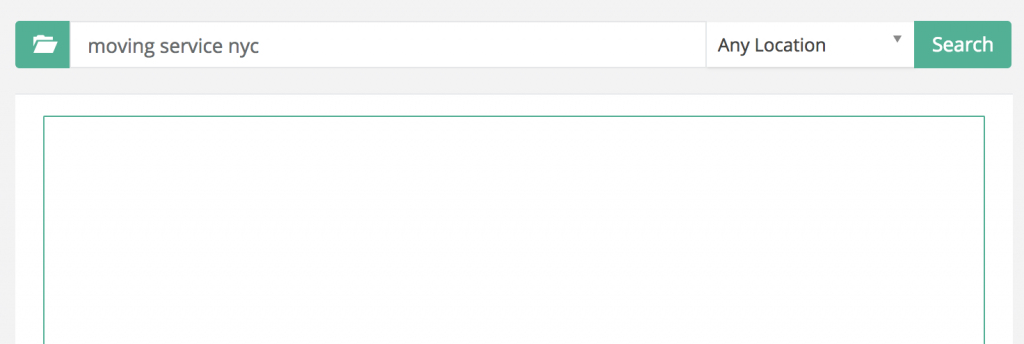
After you’ve clicked “search” it will go out and load all of the relevant data including the keyword difficulty score. You’ll notice there is a text area to work on your article as well as the right-hand column that contains the following tabs:
Main
Keywords
Research
Questions
SERPS
Main Tab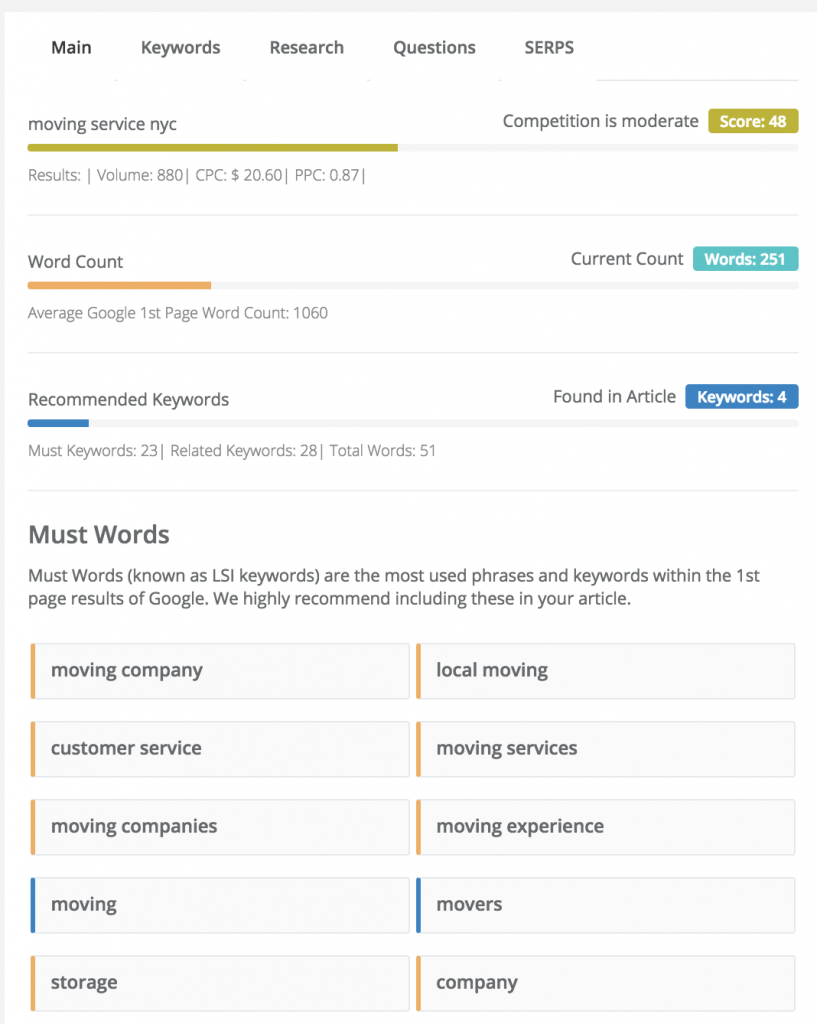 The main tab gives you an overview of the stats for you your article. It shows you the keyword difficulty, the Word Count, Recommended Keyword meters and Must Words.
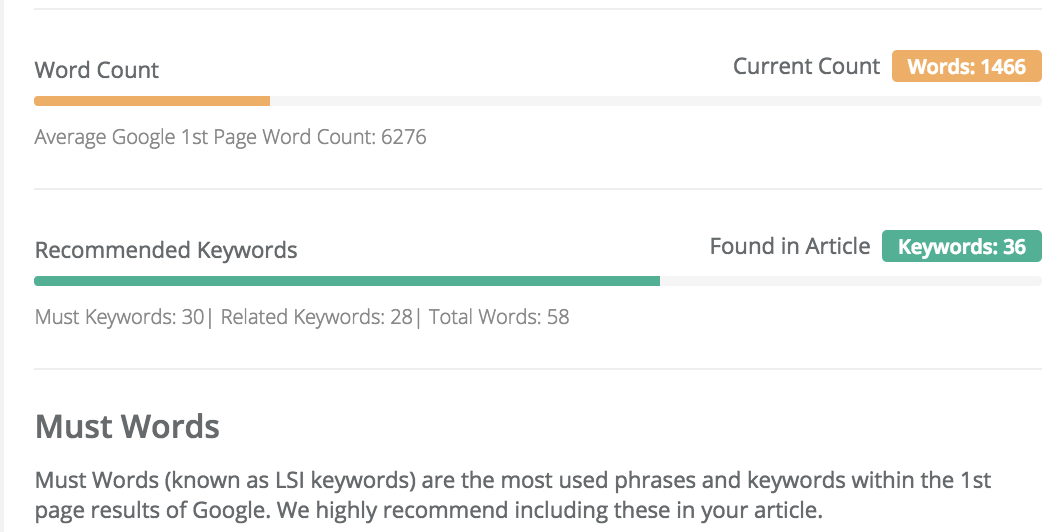
Word Count Meter
This meter will calculate the number of words in your article and compare it to the average word count of the top 10 Google results. The goal is to try and get our article word count close to or above the first-page average word count.
Recommended Keywords
This meter calculates how many of the Recommended Keywords we’ve used in our article. A safe goal is to try and incorporate as many “Must Words” as possible and around 40% of the total Recommended Keywords. More is always better though!
You’ll notice as we type any Recommended Keywords will turn from orange to blue, signifying that they are now found in your article and the Recommended Keywords meter will calculate the percentage found as well.
Must Words
Must Words (known as LSI keywords) are the most used phrases and keywords within the first page results of Google. We highly recommend including these in your article.
This feature is basically giving you an overall breakdown of what Google is really looking for in the top results. By including as many of these words as possible you are ensuring that your article is covering the overall theme of the topic and in turn giving Google what it’s looking for in a first page result for this keyword phrase.
Keywords Tab
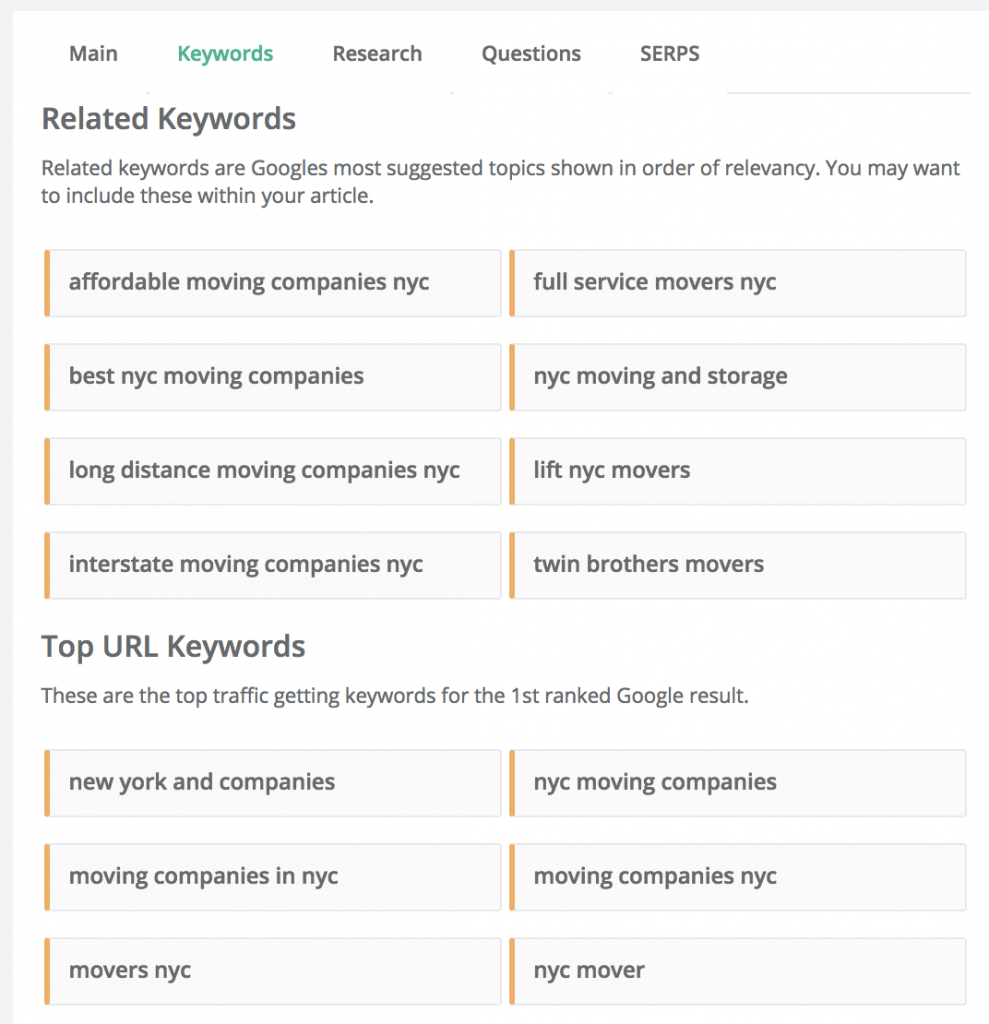
The keywords tab shows Related Keywords and Top URL Keywords.
Related Keywords
Related Keywords are Google’s most suggested topics shown in order of relevancy. These are the keywords and topics you see at the bottom of the Google results when doing a search.
This is taking an even closer look into Google’s algorithm by showing us the phrases Google closely relates to the main topic. Since they are associating these other phrases with the main topic it most likely means that by including these keywords and phrases in your article you are more thoroughly covering the overall idea of your topic, which can only help with rankings.
Top URL Keywords
These are the top traffic getting keywords for the 1st ranked Google result for the keyword searched. This is something we examined more in-depth in our website traffic analysis post but to sum up here, by having a peek into the keywords driving the most traffic for the top result, we are seeing what Google expects to see in a top result for this keyword. We are also seeing other potential traffic driving keywords and phrases that we can include in our article to really maximize all of the ranking potential for the article.
Both Related Keywords and Top URL Keywords may be hard to fit in the article “as is”. If you can great! If not though, what you are really aiming for is to include the overall topic and idea of these keywords in your article. Don’t sweat it if many of these keywords are not lighting up blue and increasing the Recommended Keywords Meter. We are using them more as a guide rather than the Must Words which we want as many blue as possible.
Research Tab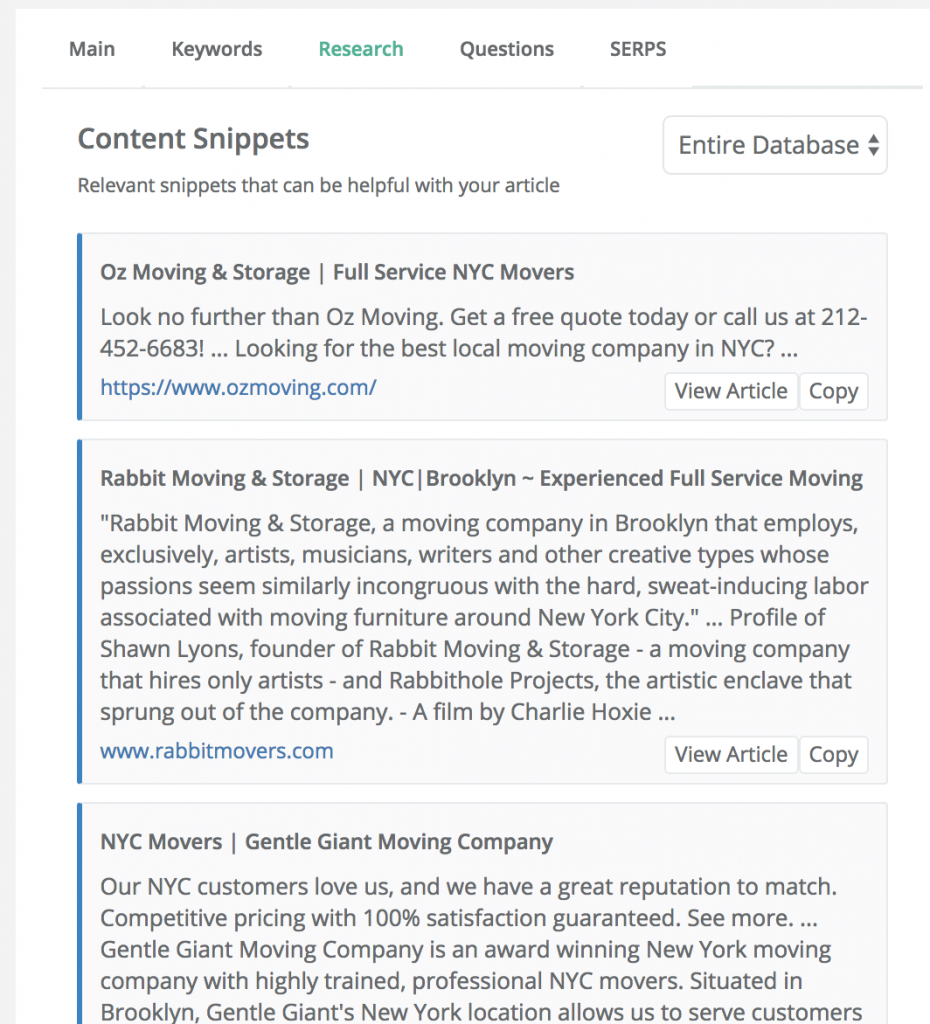
Content Snippets
The research tab contains what we call “Content Snippets”. These are relevant snippets taken from web pages found in our database. They can help you quickly research your topic by skimming the snippets or by viewing the web pages that contain the snippets easily right within the popup window.
You can also choose to only view snippets from the first page results using the “SERP Top Pages” option if you prefer.
You can also load Content Snippets for any of the Recommended Keywords by clicking on the keywords within the Main or Keywords tabs. This will load the Content Snippets panel in the article text box area. Once you are done viewing the Content Snippets you can just click “Back to article” to go back to the article text box.
Questions Tab
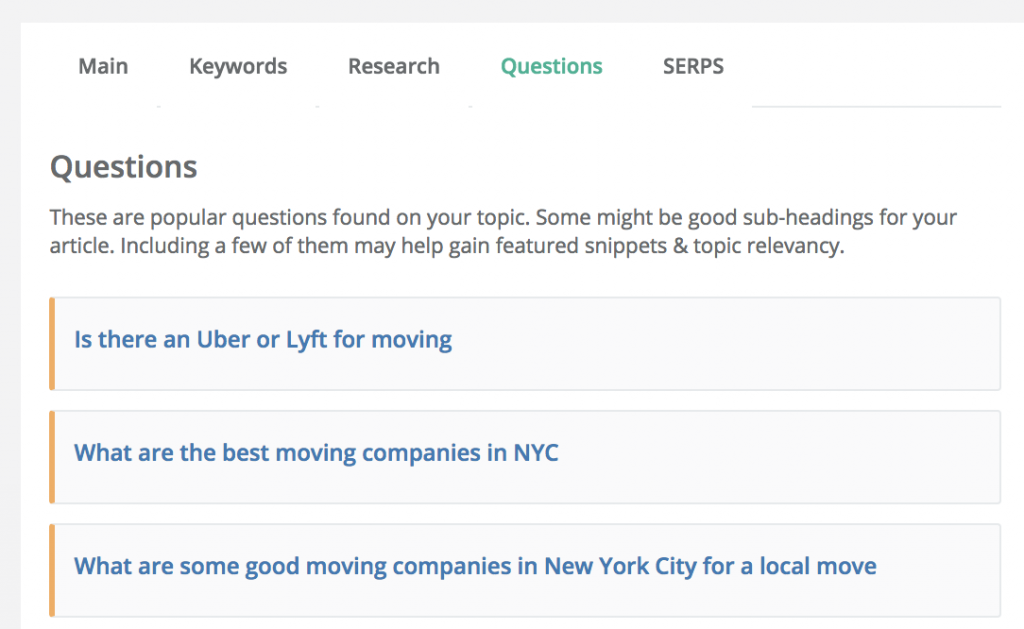
These are popular questions found on your topic. These are questions taken directly from Google, Quora, and other popular question sites. Some might be good sub-headings for your article. Including a few of them may help gain featured snippets & overall topic relevancy.
Adding questions and answers in your articles is a great way to grab a lot more long-tail traffic and Google loves ranking pages that answer questions directly.
SERPS Tab
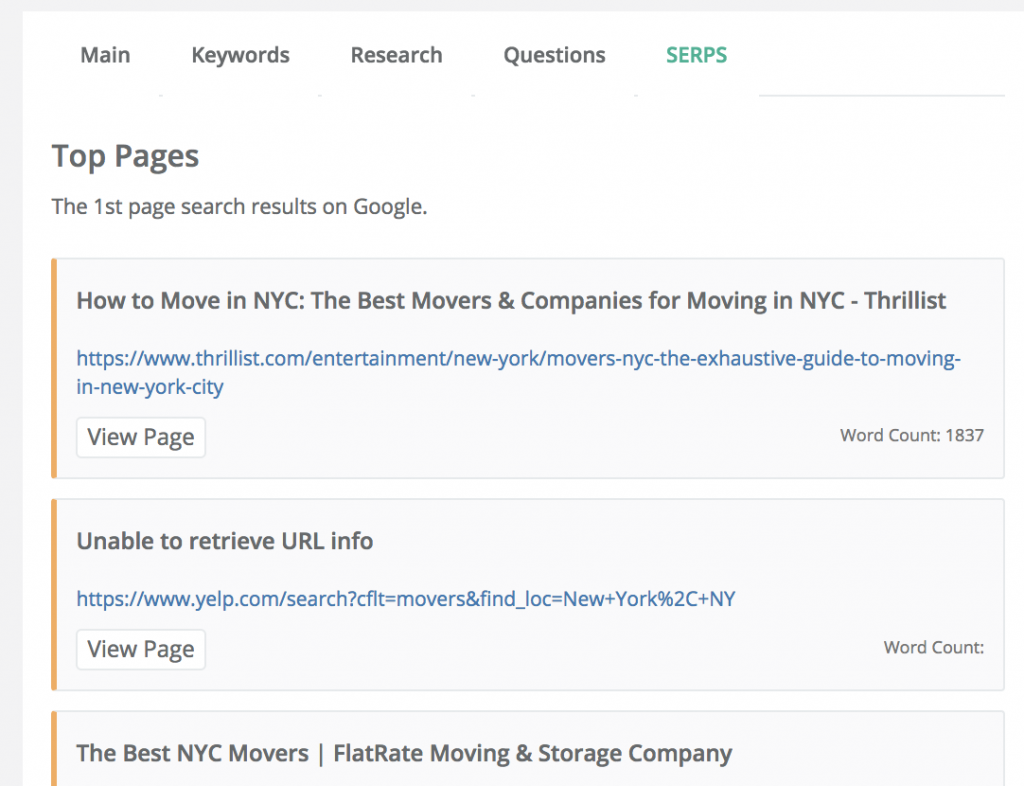
Here is where you can see an overview of the first page Google results, their titles and word counts. You can view the pages in our page view popup or click the link to open them in a new tab. This just gives you a nice quick view of the top results as a reference.
Final Thoughts
Content Assistant is not meant to replace your normal blogging tools. For me I like to write my article as normal, then copy the text into Content Assistant and build from there. Some of you may prefer to start your articles within Content Assistant. Either way, we highly recommend running your articles through to ensure you are maximizing their full SEO potential!
Content Assistant Video Overview
This video gives a quick walk-through of the features discussed in this article.
how to use keysearch
keysearch
keysearch coupon
keysearch coupon code
keysearch discount
keysearch free
keysearch free trial
keysearch pricing
keysearch promo code
keysearch review
keysearch seo
keysearch starter review
keysearch tutorial
Software MMO
में रहने वाले
Vietnam


